Friday, November 30, 2012

Just breath..

My family has adopted a new dog, she's a month new with us and she is a sweet 2 1/2 year old Lab/Shar Pei mix.  She looks nothing like a Shar Pei, and more closely resembles a smaller black lab.  She's a Pound Puppy, through and through.  We have no idea what her history is, so we know nothing of her potential "quirks".  Well, I think we've recently discovered some of them.


Let me give you a bit of back story first.  For the past year, I have been slowly knitting a scarf for my husband, a beautiful, soft, cashmere scarf.  My goal is to complete it before this coming winter.  Time is crunching closer to my end date, so I've recently picked it up again after having put it aside this summer due to purchasing our first home (that's a different train of thought for another time).  Well, my dog, Kayla, has been exploring our home and getting familiar and comfortable with her new surroundings.  This is a wonderful experience to witness and be able to participate in, I have wanted a dog for such a long time.  Anyhow, this past Monday, she wanted to explore my knitting box and discovered my nicely wound ball of cashmere yarn for my scarf project.  She wanted to taste it's silky smooth texture between her teeth evidently, and tore this ball apart, like she has her toys before.  I caught her red pawed, and was utterly dismayed at what I saw.  Hindsight I wish I would have taken a picture of it, but my emotions were too close to the surface to think rationally about the whole situation.  Luckily, she did not touch the scarf that has been already made.  I was at a loss, I cried.  I admit it, I broke down and cried like a child who's favorite toy just broke. This is what I was untangling for the next four hours.  Mind you, these pictures are after two hours of untangling already.
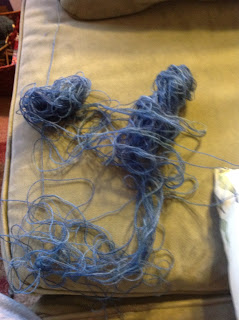


This is my end product of dangling:  I'm quite proud of myself, I'm not going to lie this was a very trying task for me.  I look forward to being able to finish this scarf before the winter comes, so that I can actually give this to my husband.  You can already see the project taking form, when I'm done, I'll be sure to take better pictures of it and show you the end product.

Saturday, May 5, 2012

Spicy Tomato Juice

A few weeks ago, I was walking down the isles at the grocery store, talking with my best friend on the phone.  Best friend, I just had a fleeting moment where I felt like I was in high school again.  Anyhow, i saw a Bloody Mary mix on the shelf and thought that it sounded so good.  I started reminiscing about the best bloody mary that I have ever had.  It was at some country restaurant on Vashon Island.  It was spicy and rich.  Never again, have I had one quite like it. At the time I contemplated purchasing this drink mix, due to nostalgia overtaking my thoughts.  Then she says to me, "Why don't you make some yourself and post it on your blog!", what a marvelous idea!  So, over the course of the last few mornings, I've taken to making a spicy concoction for my mornings, sans the vodka.  Although, I believe with the vodka, would be just as tasty, if not a smidge better.

What you'll need:


4 1/2 Cups tomato juice (I've got Low Sodium V8 on hand all the time)
4 tsp Worcestershire Sauce
3 tsp hot sauce
2 cloves pickled garlic minced (originally posted here at the bottom of the site)
2 Tbsp of the pickled garlic liquid
1/8 tsp black pepper
1/4 tsp ground ginger
1/4 tsp dried dill
1 tsp lemon juice
Celery Stalks, Olives, or any other fun condiment to add


Add all ingredients, except the condiments into a pitcher or large measuring cup (it would have to be 4+ cups big), mix.  Rim your glasses with salt and ice if desired.  Add your condiments and serve.  Makes 4 servings.

My family loved this.  I have to share.  When I first started experimenting with this earlier this week, it was in the morning when my son and I get ready for our day.  I made some to go along with our breakfast.  He asked me what I was making, I told him it was bloody mary mix without the alcohol.  Not that he really knows what is in it but he knows that I enjoy Bloody Mary's once in awhile when we go out for breakfast.  Anyhow, I poured him regular tomato juice to have with breakfast, asked him if he wanted to try some of mine.  His eyes got real wide, he got this huge smile on his face and you could see the excitement he was trying to contain.  He caught himself and got real serious and said "Yes, please".  Well, he complimented my drink and said he really liked it.  I found out from my husband later that night that he came home and was talking with him about it, saying that he got to have "Bloody Mary's" with breakfast this morning.  Now, we have since established with him that he needs to refer to them as "Spicy tomato juice", since we know that he maybe going around to his friends and such wanting to talk about how he got to have a Bloody Mary.  Should an adult hear this, we may get some interesting questions about our parenting skills.

Tuesday, April 24, 2012

Sunny Orange Yogurt Muffins


This morning was absolutely beautiful! The sun was streaming through the kitchen and showing signs of spring, finally!  This weekend was warm and sunny, a nice contrast to the typical Northwest cloud.  To bring in this wonderful day, I had to bake a treat that reflected this morning.  So this time, I broke out one of my most loved cookbooks, William Sonoma.  I love how moist and subtly sweet these muffins are.  It's like a small sunburst in your mouth, maybe that's the sun-drenched happiness speaking but either way it's intriguing, don't you think? 

You can find the recipe here.  This is for the quick loaf bread, but it's exactly the same for the muffins.  It should make 14-18 regular sized muffins.  I made 12 regular muffins and 12 minis.  I love minis, they bring me back to my childhood.  When Hostess first introduced the mini muffins in a bag, it was all the rage then.  Banana Nut was my favorite at the time.  They are still around, I see them every now and again, but the real joy for me now, is knowing that I can make them ten times better in my own kitchen.  Anyhow, back to my point, these muffins are sure to bring a bit of sunshine to anybody's day.


Tuesday, April 3, 2012

Spiced Cranberry Muffins - Low-fat


I had an itch to bake this morning.  Why, I'm not really sure but baking some quick muffins at 6 o'clock in the morning sounded like a fantastic idea!  So, I whipped up some spiced cranberry muffins to bring into work because I cannot leave all of these muffins at home. I would eat them, ALL of them in one sitting. This cannot happen.

Anyhow, I had a Costco size applesauce sitting in my fridge for some time that needed to be used (I'm starting to notice a trend here.  Can you see it?).  Why my family chooses to ignore it in the fridge, I'm not sure.  Wait, I know. Because I live with men and boys.  They go for the easiest thing they see, apparently applesauce isn't that easy to prepare (open the bottle, pour into a bowl, add some cinnamon if desired and enjoy!). Sorry, I'm having a couple side thoughts travel through my brain.  Back to my story: I have wanted to try substituting applesauce for oil for some time now to see how different the product would turn out.  Yes, I admit I'm a bit slow to get on the applesauce substitution train.  My reasoning behind it is because a few years ago, my friend was substituting applesauce for oil in a cookie recipe.  Now, what she gave me to try, was absolutely horrible!  I kid you not, love her, not her substituted cookies.  Needless to say, this turned me off to this substitution for quite some time.  As it turns out after my experiment, this can work out pretty good. Now my first attempt was a bit dry, but I've tweaked it (again) and I think these are so much better.  They have a good sweetness and are perfect with a cup of tea or coffee for a quick on the go morning rush. 

Heat the oven to 400 degrees
1/2 Cup Whole wheat flour
1 1/4 Cup All purpose flour (you can omit the whole wheat and use all purpose too if you want, so use 1 3/4 C total flour instead if you do this)
1/3 Cup Zero calorie baking sugar (or you can use regular sugar, or a different sweetner substitute)
2 tsp Baking powder
1/4 tsp salt
1/4 tsp Ground ginger
1/2 tsp Ground cinnamon
1/4 Cup applesauce
3/4 Cup milk
1/4 Cup Greek yoghurt
1 Egg
1/3 Cup Dried Cranberries

  • Mix the dry ingredients together in a large bowl, set aside.
  • Mix the wet ingredients together in a smaller bowl and  mix into the dry ingredients.
  • Combined until you make a batter and add the cranberries and mix together.
  • Line a 12 cup muffin pan with paper liners or lightly grease.
  • Fill the muffin cups 3/4 full.
  • Bake at 400 degrees for 15 minutes.
  • Cool on a wire rack.
You can also omit the ginger and cranberries and add 3/4 Cup blueberries to the batter instead.  These turn out really good as well.

Wednesday, March 21, 2012

Carrot Soup with Roasted Peppers

When I got home today, I found my husband in a foul disposition, for good reason.  To begin my story:  This past week, Alaskan Salmon was on sale, $4.99/lb whole fish.  Amazing deal right? So I bought a fish, weighing in at over 5 pounds.  It was frozen when I purchased it, because they ran out of the thawed fish so quickly.  So it has been thawing in my fridge since Saturday, well over four days.  Well, my fish leaked, fish juice all over my beautiful veggies in the drawer (luckily, they were all in bags, but still.  Precautions must be taken).  So now I need to cook them.  I had over three pounds of baby carrots, almost a full bunch of celery, four bell peppers and my wonderfully large Costco bag of peeled garlic.  What is a girl to do?  Since I had the most carrots, I thought a soup would be good.  So, as we speak, I'm cooking up a wonderful batch of roasted pepper and carrot soup.  Doesn't that sound good?


Roasted peppers out of the oven


To roast the red peppers, you need to halve them and take out the seeds.  Take a baking sheet and line it with foil (I only do this so that I don't have to clean it up after). Spray it with some cooking oil (I used canola) and place them cut side down on the foil.  Your oven should be heated to 450,  cook them for approximately 30 minutes, turning them halfway through, until they start to char on the skin.  When you bring them out, allow them to sweat by covering them for about 10 minutes.  This makes the skin easier to take off, you can peel the skin either by hand or with a paring knife.  Once you have done that, dice them and set them aside.


Peeled roasted peppers


What you will need: 
1 medium onion, chopped
10 (or less) cloves, peeled and diced garlic
3-5 lbs Carrots (baby or regular), chopped
1/2 bunch celery, chopped
4 bell peppers, halved and seeds cleaned out
6 1/4 cup water
1 teaspoon (or two cubes) vegetable bouillon
2 teaspoons kosher salt
1/4 teaspoon ground black pepper
2 bay leaves
1 Tablespoon minced ginger

While your peppers are cooking, you can begin the soup.  I chopped up all of my carrots, celery and the garlic.  I love garlic, so by all means, feel free to use less.  I took an onion and chopped that up too.  

  • Heat up about two teaspoons of oil in a tall pot.  I used olive oil but you can use butter or canola, which ever you have on hand.  Place the onions and garlic in the pot after it has heated and simmer until they start to brown a little.  
  • Add your carrots then celery and about two teaspoons of kosher salt.  Stir around for a few minutes, the moisture will have left the pan, so add a little water into the pan, about 1/4 cup so that you don't burn your veggies.  Simmer for about  5-10 minutes.  
  • Add about 4 cups of water to the pot.  I also took a heaping teaspoon of vegetable bouillon and added it to two cups of hot water to liquify, add to the pot.  
  • Throw in about two teaspoons of kosher salt, ground black pepper, minced ginger, and the bay leaves.
  • Simmer on medium low for approximately 1.5-2 hours or until the carrots are tender enough to smash with a fork
  • When your peppers are done, add them to the pot to, to mix and mingle with the soup

The soup is thick, so if you want it thinner, add some more water or broth to thin it out.  Once the carrots are tender enough, remove the soup from heat and blend it in a blender or food processor.  Serve hot or chilled with a dollop of sour cream.  You could even sprinkle some croutons on top or serve with some warm crusty bread.  It's so good! 


Tuesday, March 6, 2012

Fat Free Veggie / Cracker dip

My family loves veggie dips, but we do not want to incorporate all of the extra fat and oils that can be included in store bought dips.  For this reason, it forced me to come up with a really good base dip for veggies and crackers.  Once you make the base, you can add anything else you want to customize this and make it your own.


The base:
1 package Fat Free cream cheese
1 small tub (16 oz) of Fat Free sour cream (Nonfat Greek Yogurt works too)
1/4 tsp pepper
1/8 tsp salt
1/4 tsp garlic powder
1/4 tsp dill
3 Tbsp apple cider vinegar

Mix it all together.  I use my Kitchen Aid with the paddle attachment.  This makes it nice and creamy.

Here's a short side note story.  I recently purchased one of those huge bags of peeled garlic from Costco, but I never seem to use it all before it goes bad.  Well, I found a site that tells me how to pickle my garlic cloves in the fridge and I did this weeks ago.  The point of my rambling, is that I used some of this pickled garlic and the vinegar with it and made a FANTASTIC garlic dip.

On to the extras.  As I stated above, you can add most anything to the dip and make it your own.
In my pictured dip:
4 cloves pickled garlic (plus 2 Tbsp of the vinegar)
1/4 tsp dried Thyme
1/8 tsp ground Sage
1/8 tsp ground Ginger
1 tsp chopped dried red onion
1/2 tsp chopped chives
1/2 tsp chopped parsley


If you want to make this more like a dressing for salads, you can thin it out with milk to the consistency you desire. I've also been known to add shredded carrots and cucumbers to the mix if it's meant more as a spread for crackers or sandwiches.

If you are interested in other preserving methods for garlic, here is the site I found.  The refrigerated garlic is at the bottom of the site: Preserving Garlic


Sunday, February 26, 2012

Braided Apple Pastry

I gained inspiration for this off of a Better Homes and Garden recipe I found years ago.

I made it last night for my family, and it turned out so good!  To start, I'm not very good at keeping track of my measurements  while in the process of making my "goodies".  So, the measurements can be (and should be) adjusted to your liking.

Warm the oven to 325 degrees
1 Sheet puff pastry, thawed
1 Medum apple chopped, I used Pink Lady
1 1/2 tsp Cinnamon
2 tsp Flour
Dash of Ground Ginger
Dash of Nutmeg
2 packets of Truvia (or approximately 2-3 tsp of sweetener of your choice)

Mix the apple and spices with 1 tsp flour and the Truvia in a bowl.  Set aside.
On a lightly floured surface, roll the puff pastry out to the thickness of your liking.
On the longest sides of the pastry, make slices towards the center of the pastry (almost like you are cutting hash marks into it), while leaving the center of the pastry intact.
Place your filling into the center of the pastry.
Fold over the ends, to seal in the filling.
Take the strips of pastry and crisscross them over each other, creating the "braid" look.  Once you get to the other end, pinch the last two strips to the end to seal.
Lightly grease a cookie sheet and place the pastry onto the cookie sheet and place in the oven.  It should take approximately 20-30 minutes to cook all the way through.  Remove from the oven and serve!

You could always serve it with some whip cream or ice cream too.  This reminds me of the apple pie from McDonalds only "super-sized" and so much better.